Tasks in Cliniccards is a task management system that works on the principle of Kanban boards.
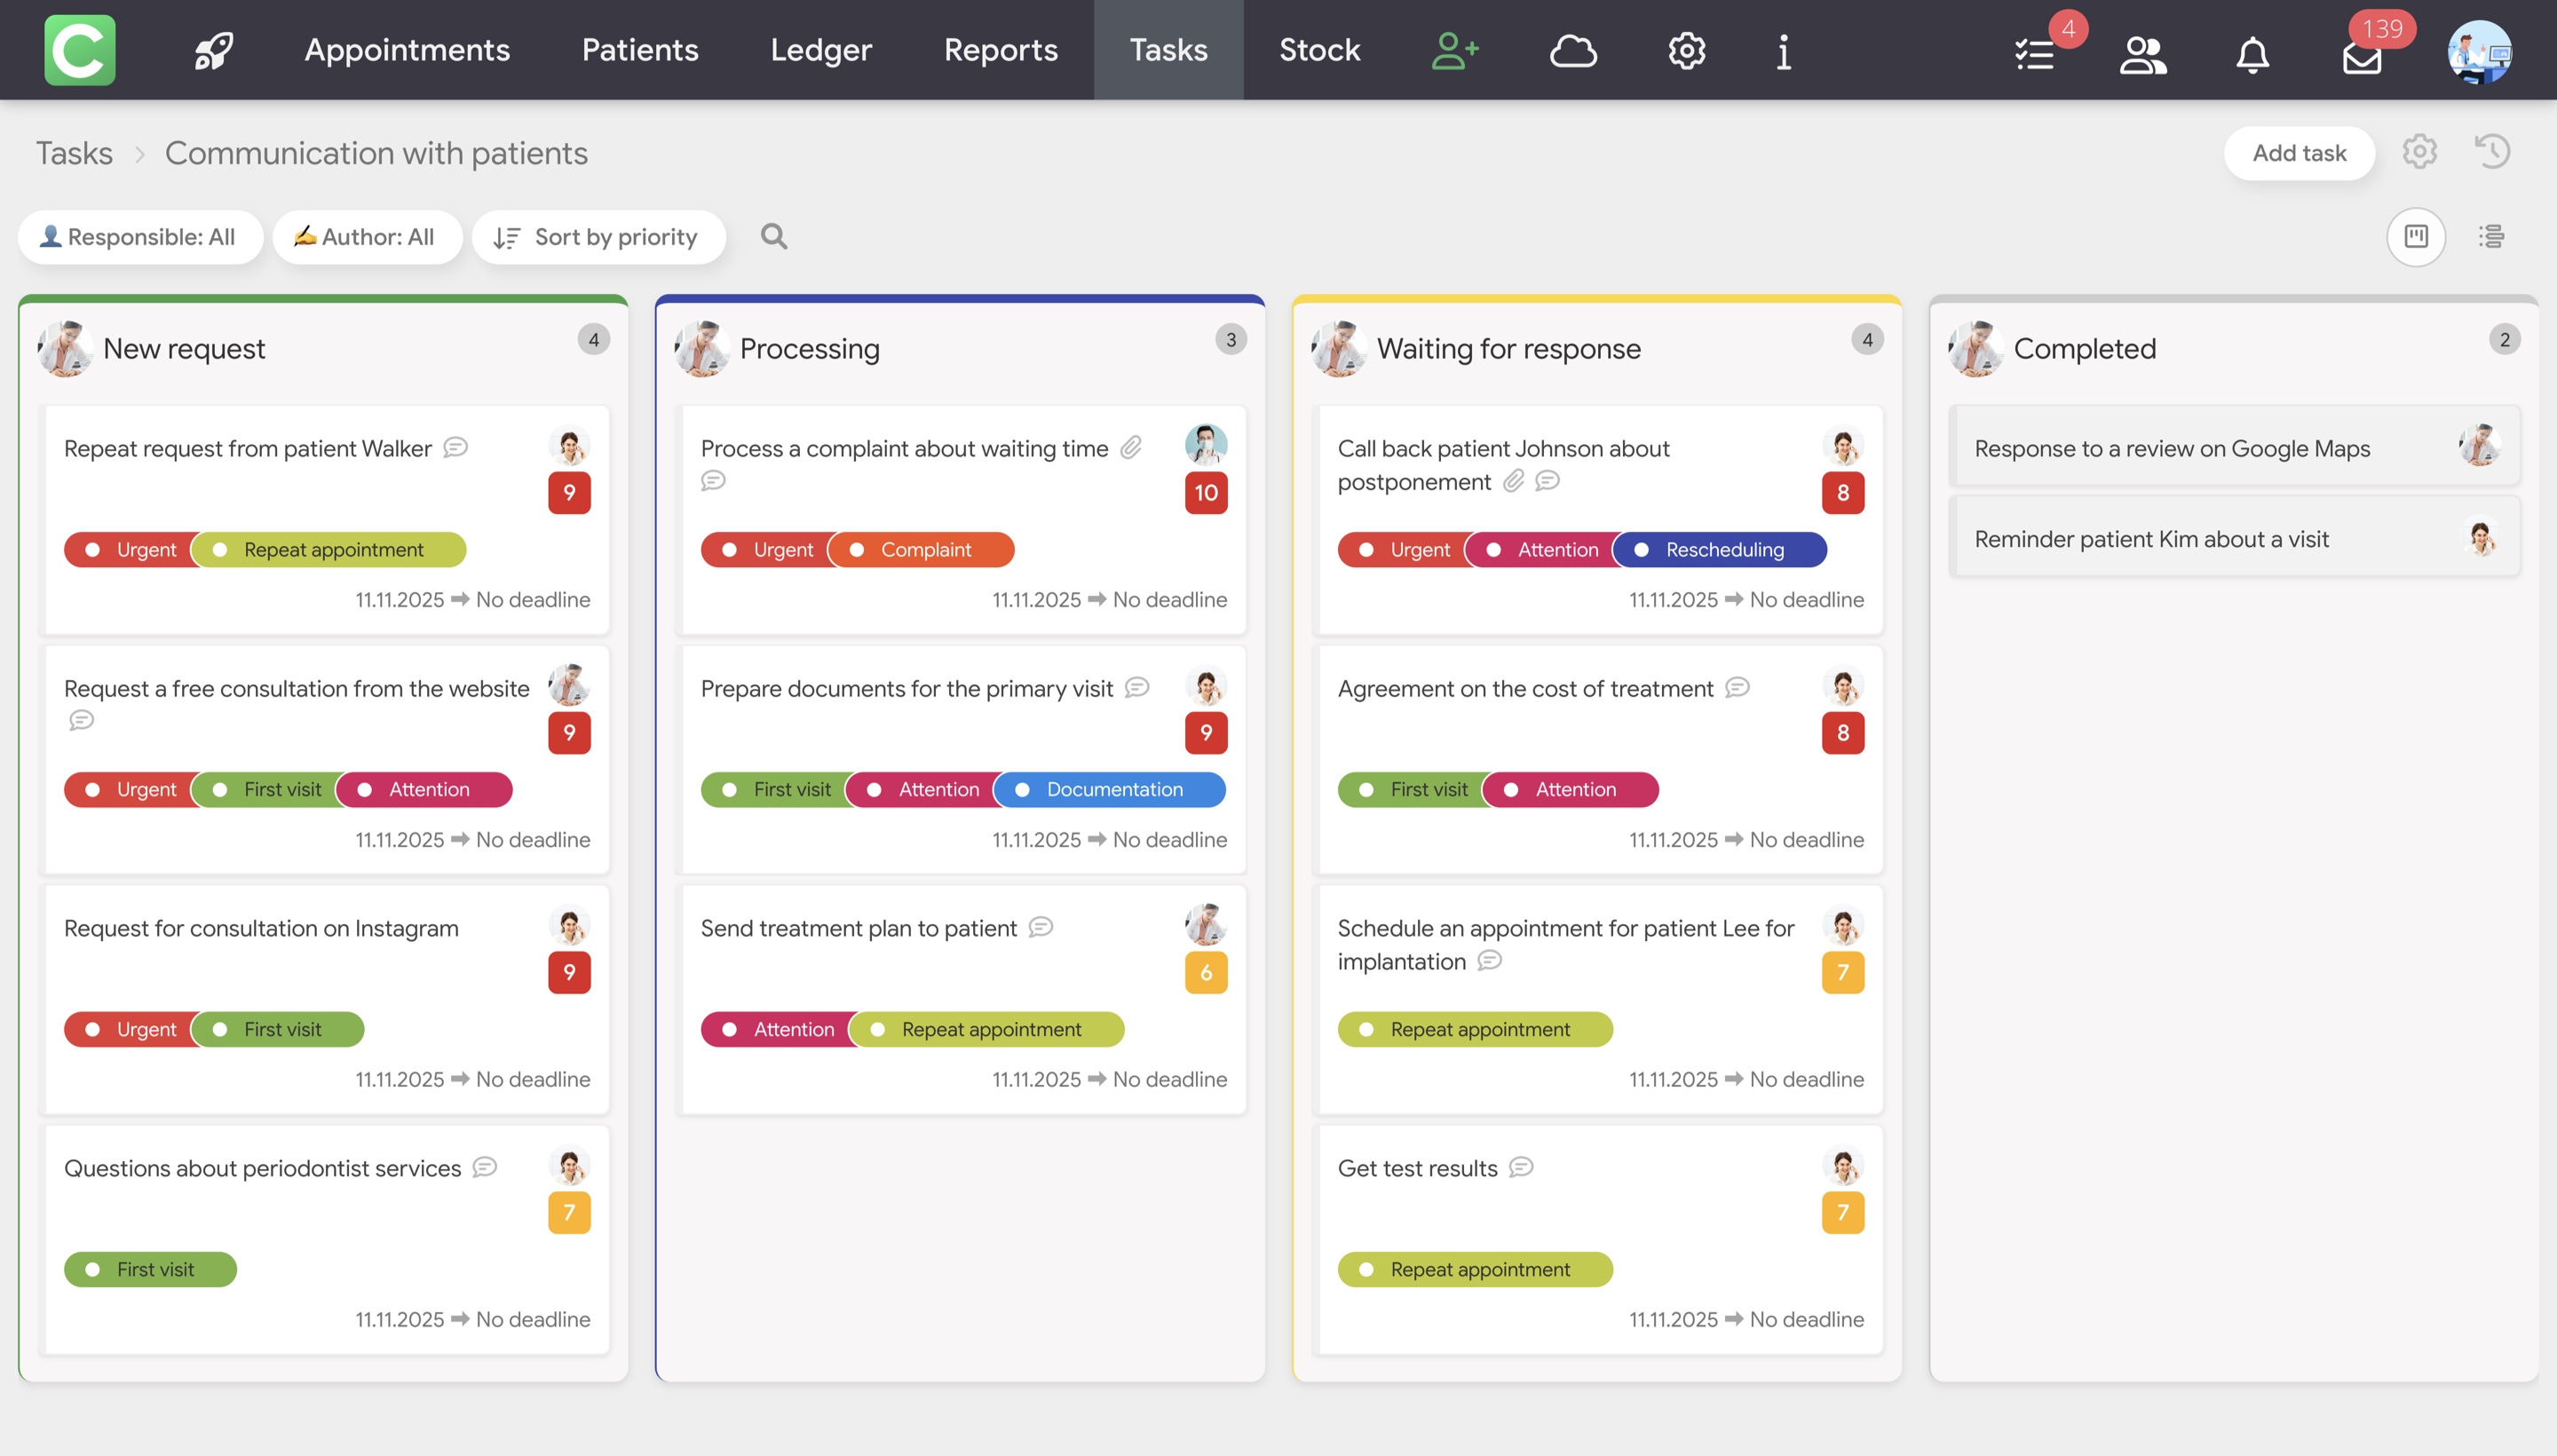
A Kanban board is a visual way to organize work: all tasks are displayed as cards that move between status columns (e.g., “New,” “In Progress,” “Done”). This approach allows you to see at a glance what is currently being done, what has already been completed, and what needs attention.
TheTasks module allows you to plan, distribute, and control all work processes in a clinic or laboratory.
Key benefits:
Visual tracking of task progress
Distribution of responsibilities among employees
Control of deadlines and completion dates
Centralized communication for each task
Archiving and analysis of completed work
Main elements of the module:
Boards – workspaces for different areas of activity
Statuses (columns) – task completion stages
Tasks – specific tasks with details and files
Labels – tags for categorization and filtering
How to activate Tasks
To start working with Tasks, you need to activate the module in the clinic settings.
Only the clinic owner or super administrator can activate Tasks.
After activation, the module becomes available for configuring teams, boards, and access rights.
Creating and configuring boards
How to create a board
Go to the Tasks module.
In the upper right corner, click Add board.
In the new window, fill in the basic parameters:
Board name.
Responsible person – board manager (optional).
Active switch – the ability to make the board inactive.
Editing a board
After creating a board, you can:
Change the name and description
Assign another person in charge
Configure access rights
Add or change labels
Archive outdated boards
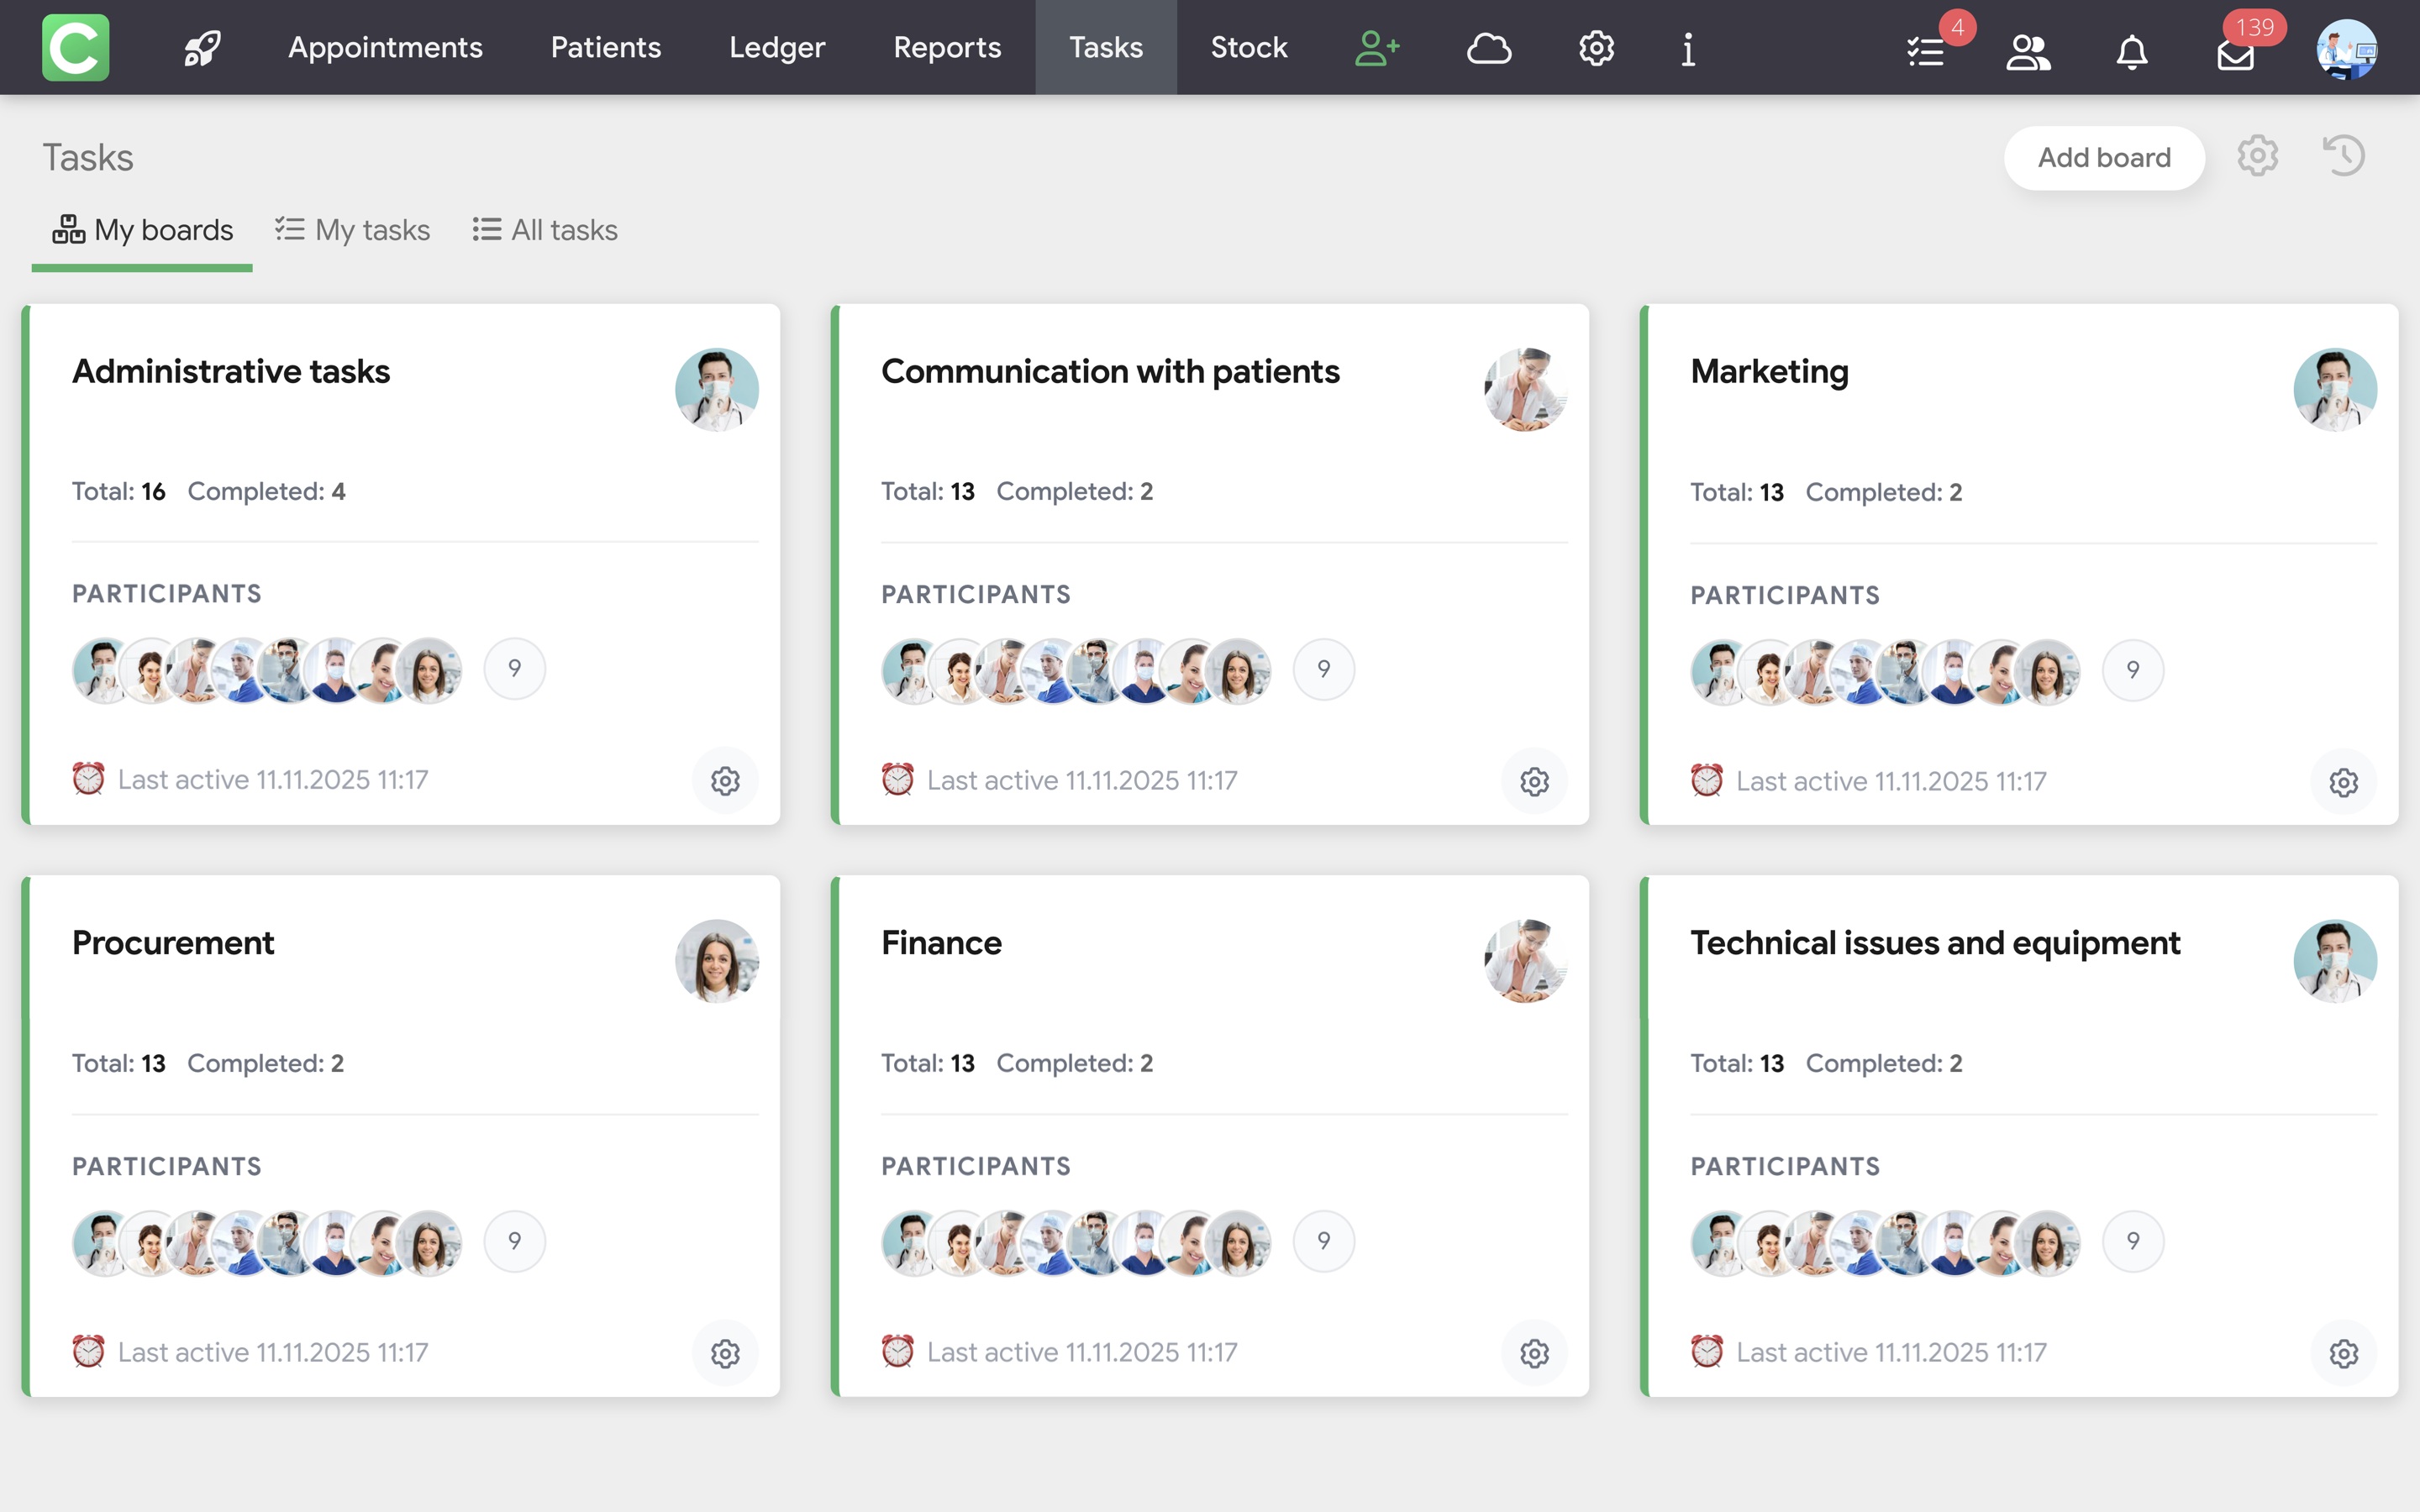
Test boards when activating the Task Manager
Please note that when you activate the Tasks module, two boards are automatically created:
Administrative tasks
Communication with patients
These boards are test boards, as are all the tasks and comments on them. They are designed to demonstrate how working with Tasks might look in a real clinic.
Test boards can be:
edited;
filled with your own tasks;
or deleted completely.
Status settings
What are statuses
Statuses are columns on a Kanban board that reflect the stages of task completion. Tasks move between statuses depending on their progress.
Configuring statuses:
Click the Settings button in the upper right corner to go to the board settings
Select the Statuses section and add the necessary statuses
Set color coding
Sort the columns in a logical order
Important: The last column always has the status “Completed.” Therefore, when a task enters this column, it is automatically marked as completed and turns gray.
Viewing and navigation
There are three modes for viewing boards:
Kanban – classic view with columns (default mode)
List – tabular view of all tasks
Gantt chart – project timeline (in preparation for release)
To switch between modes, use the buttons located in the right corner above the columns.
Creating and managing tasks
To create a task
Click the Create Task button in the upper right corner.
Enter the task name.
Enter the required parameters.
Each task contains the following main fields:
Author – who created the task (filled in automatically)
Responsible – who will perform the task
Priority – low, medium, high
Tags – tags for categorization
Patient – link to a specific patient (if necessary)
When creating a task, you can immediately assign any status in the “Task status” field. This means that a new task can be created at any stage of the workflow.
When setting a task or later, you can specify the completion dates:
No deadline – tasks without strict deadlines
Deadline – specific date and time of completion
Period – start date and end date of work
Or use the Quick Planning option:
“tomorrow” – deadline for the next day
“the day after tomorrow” – deadline in two days
“in a month” – deadline in 30 days
Or specify a specific date and time
Task description
In the description field, you can upload and save all important information about the task, for example:
Text formatting
Creating lists
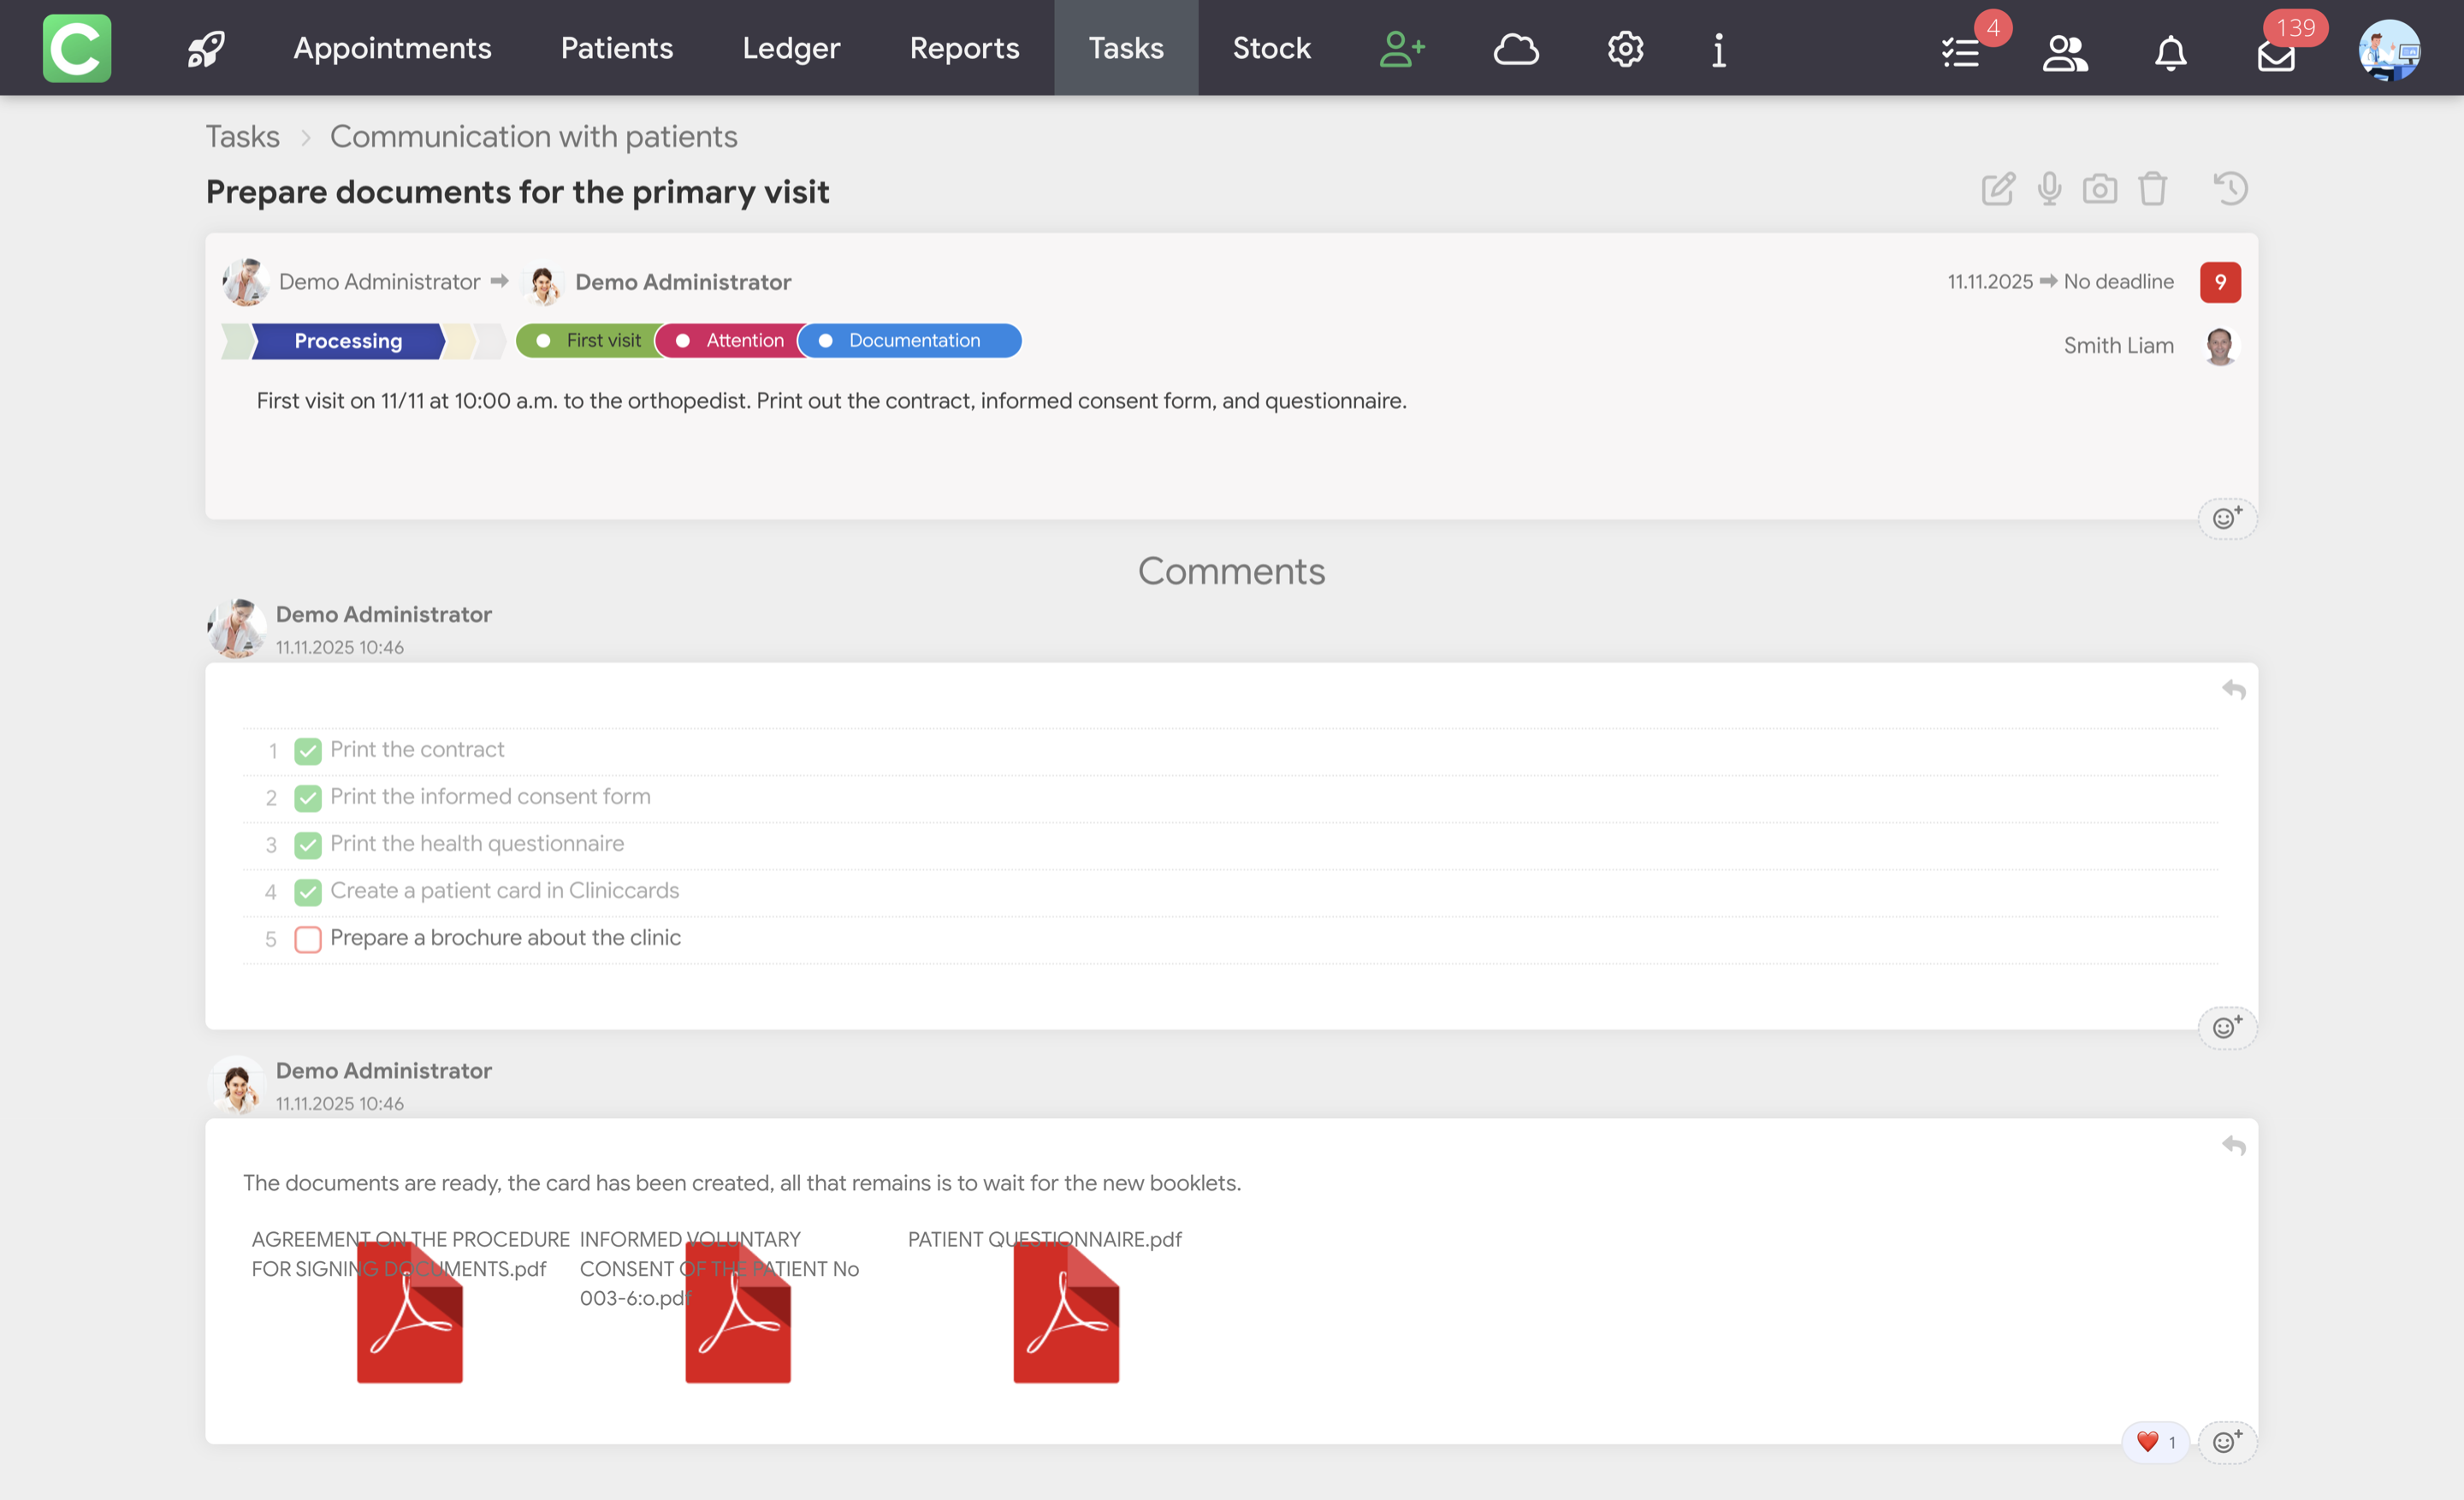
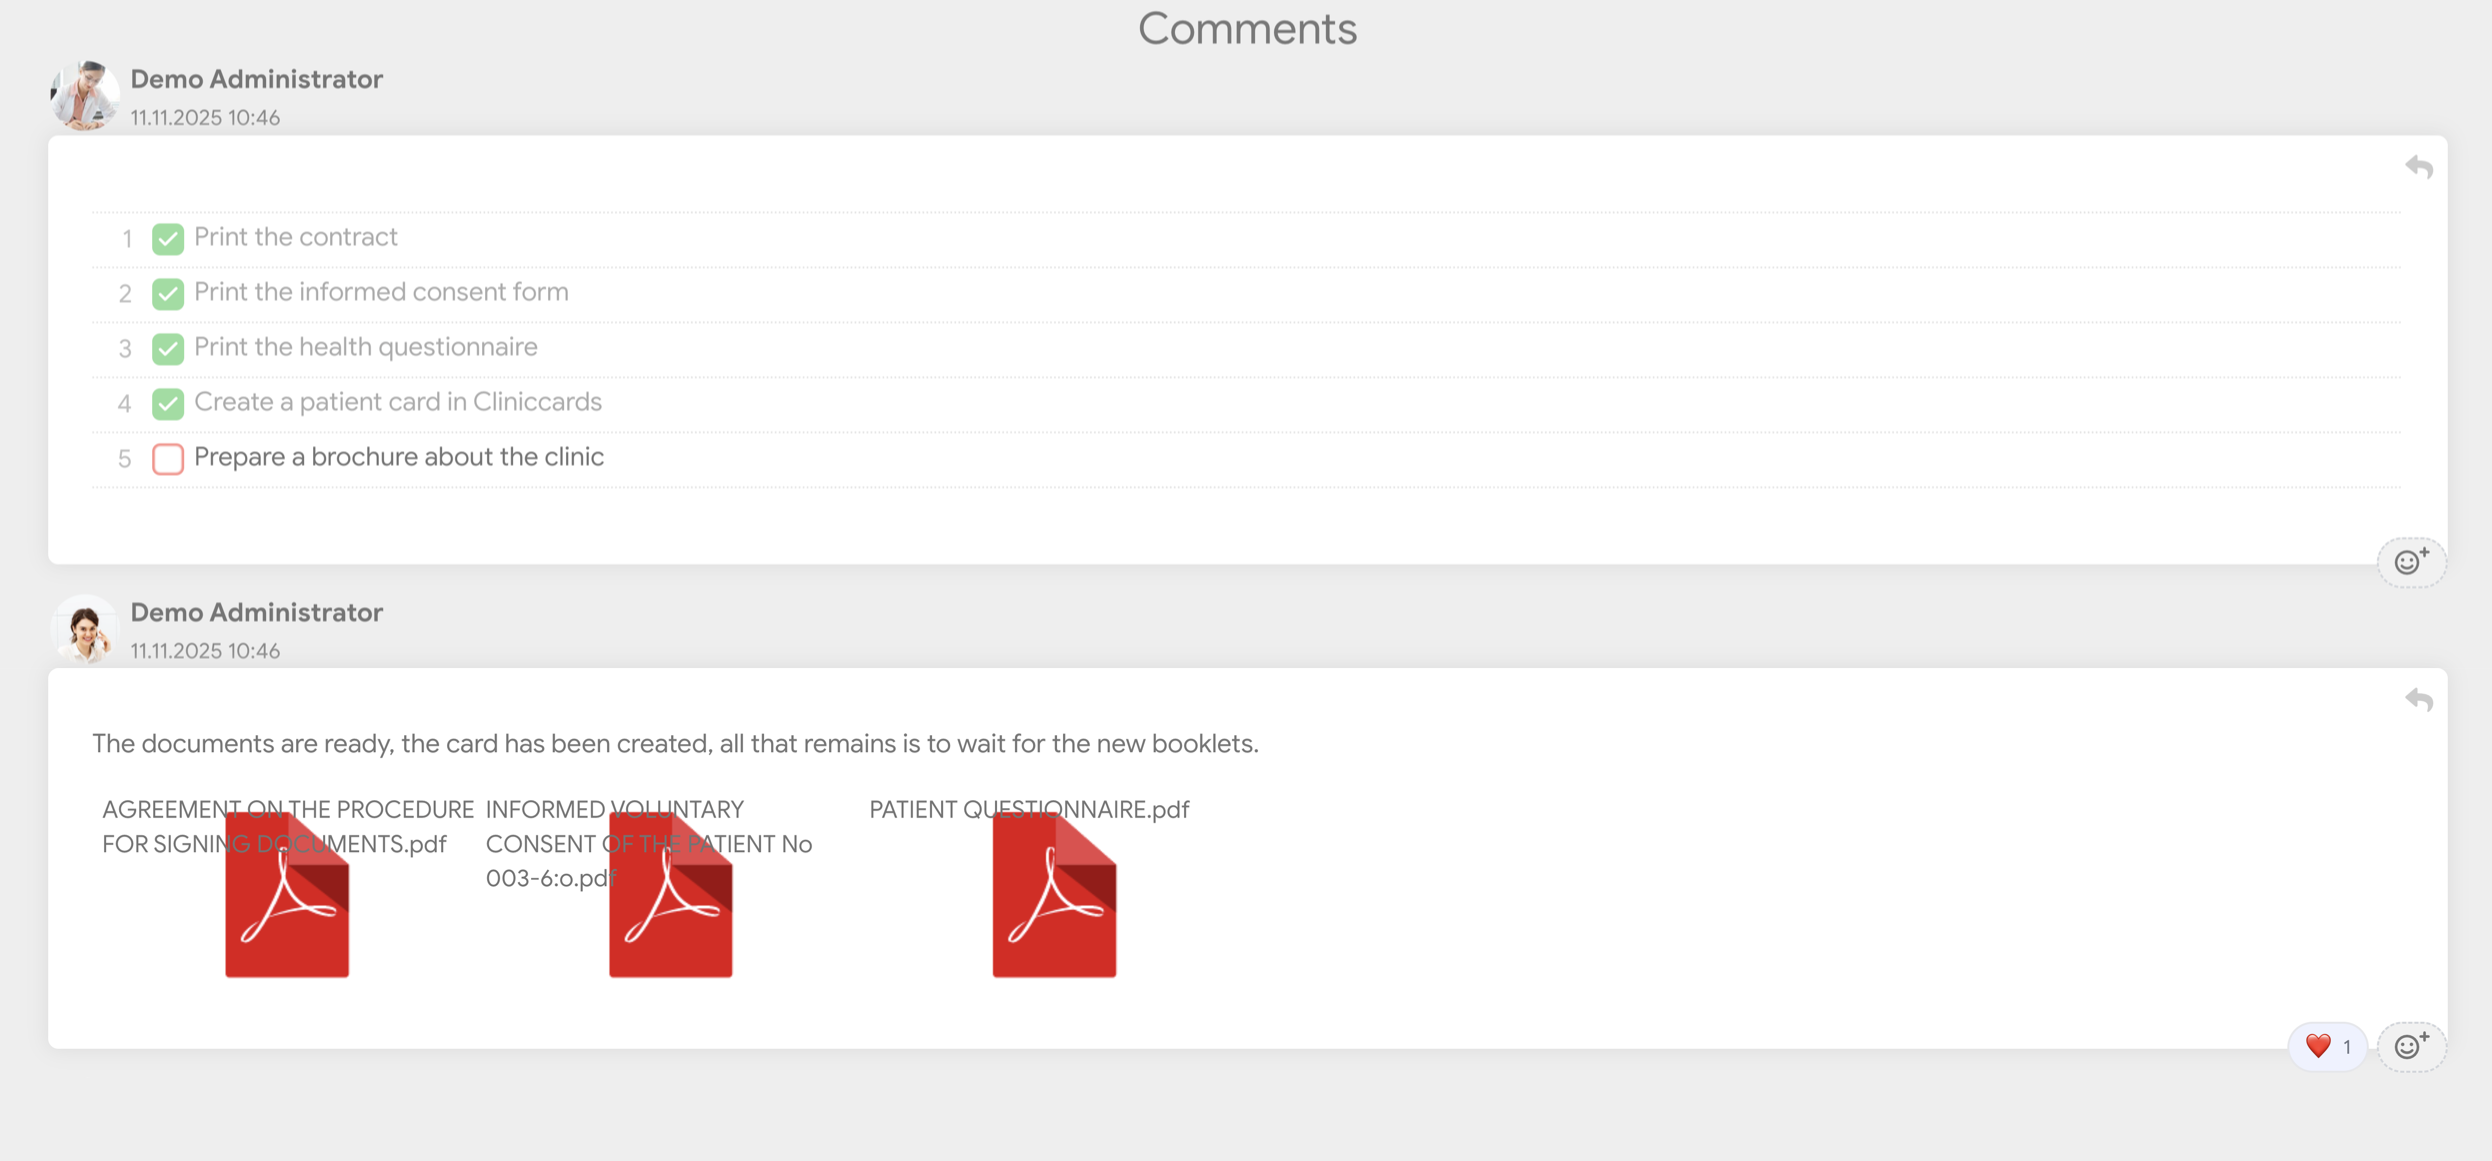
Checklists – lists with subtasks that can be checked off
Adding hyperlinks
Uploading files (photos, documents, audio)
Mentioning colleagues via @ (a notification is sent)
Recording audio messages with the option to transcribe them into text
Moving tasks
Drag and drop tasks between columns by holding down the left mouse button. The status is automatically updated according to the new position. When moved to the last column, the task is automatically marked as completed.
Working with checklists and subtasks
Creating checklists
To add a checklist to a task, follow these steps:
In the task description, click the list button
Enter the list items
Save the task
Mark completed items with check marks
Tracking progress
The system automatically logs all actions with checklists and stores the following information:
Each task has its own chat for discussing details. In comments, you can:
Write comments directly in the task
Mention colleagues using @ for immediate notification
React to comments (likes, emojis)
Reply to specific messages
Record, save, and transcribe voice messages
Notifications
The system automatically sends notifications in the following cases:
When mentioned via @
When assigned as responsible
When comments are added to your tasks
When the deadline is approaching
Sections for work
Boards
Boards are designed for working on specific projects. Key features:
Kanban view with status columns
Drag and drop tasks between stages
Organize tasks by work area
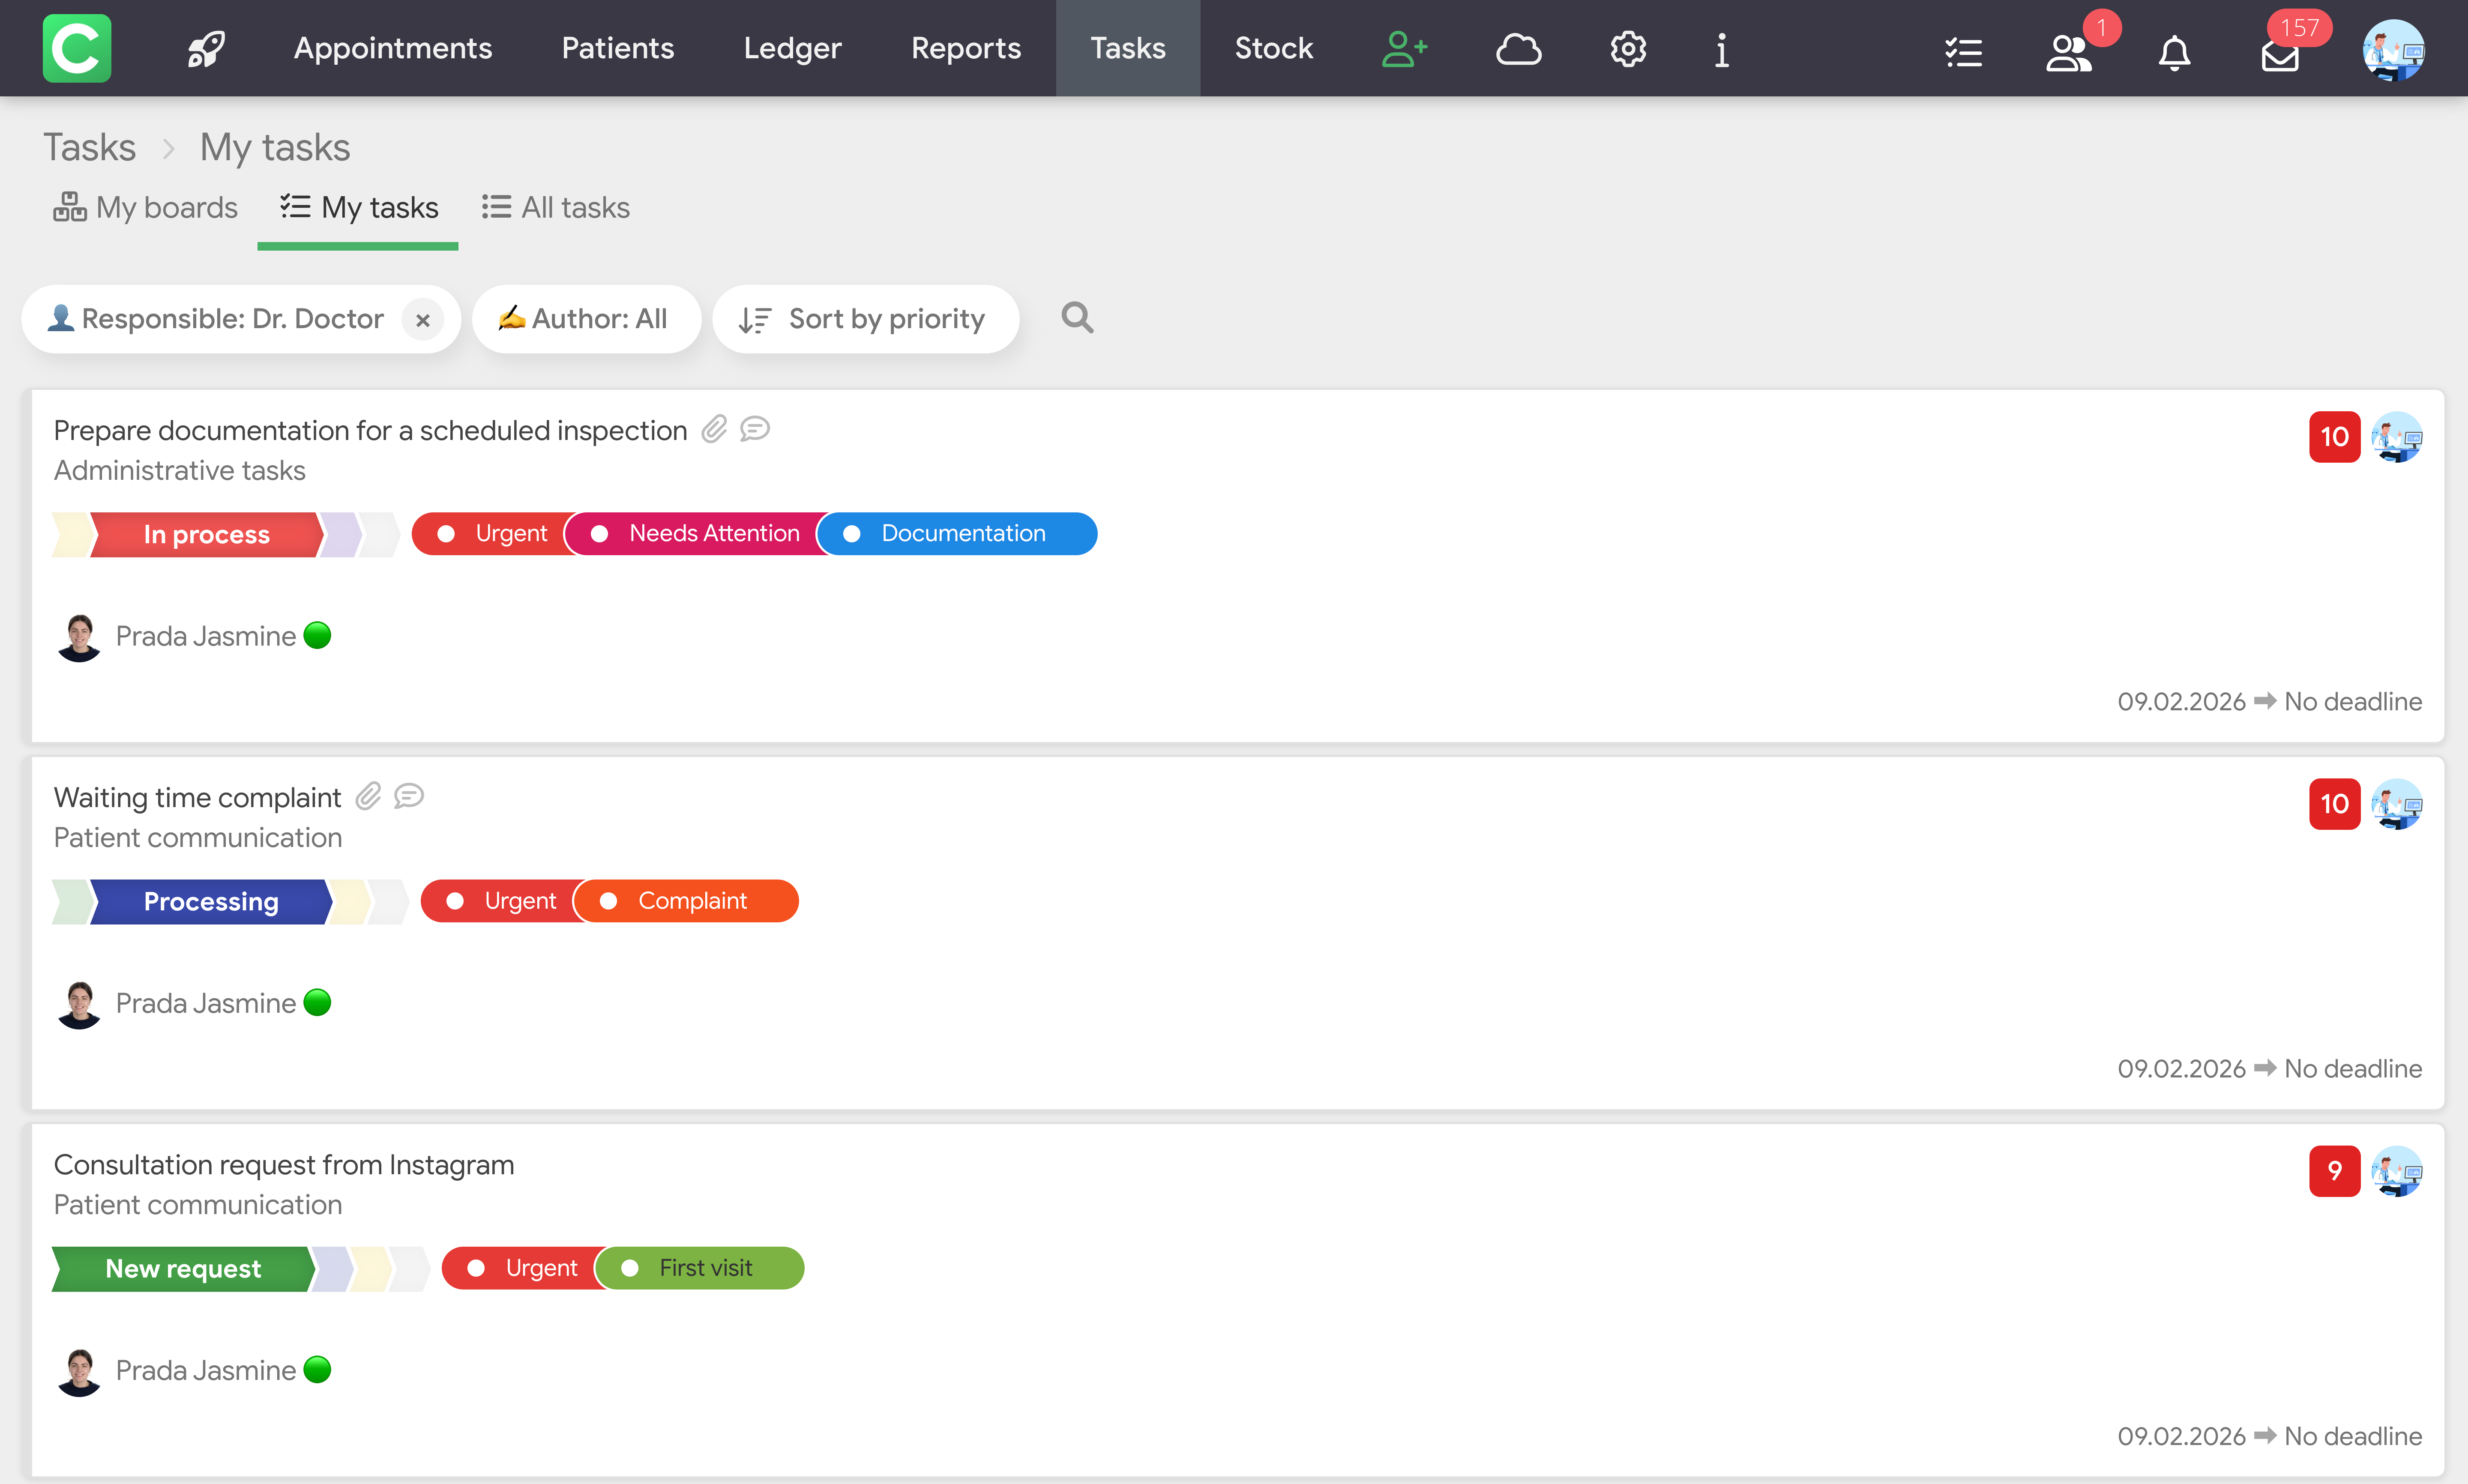
My tasks
This section displays all tasks for which you are responsible. Section features:
Tasks can be from different boards
Sorting by priority and deadlines
Convenient overview of personal workload
All tasks
General overview for managers with the following features:
All clinic tasks in one place
Advanced filtering options
Analytics for all projects
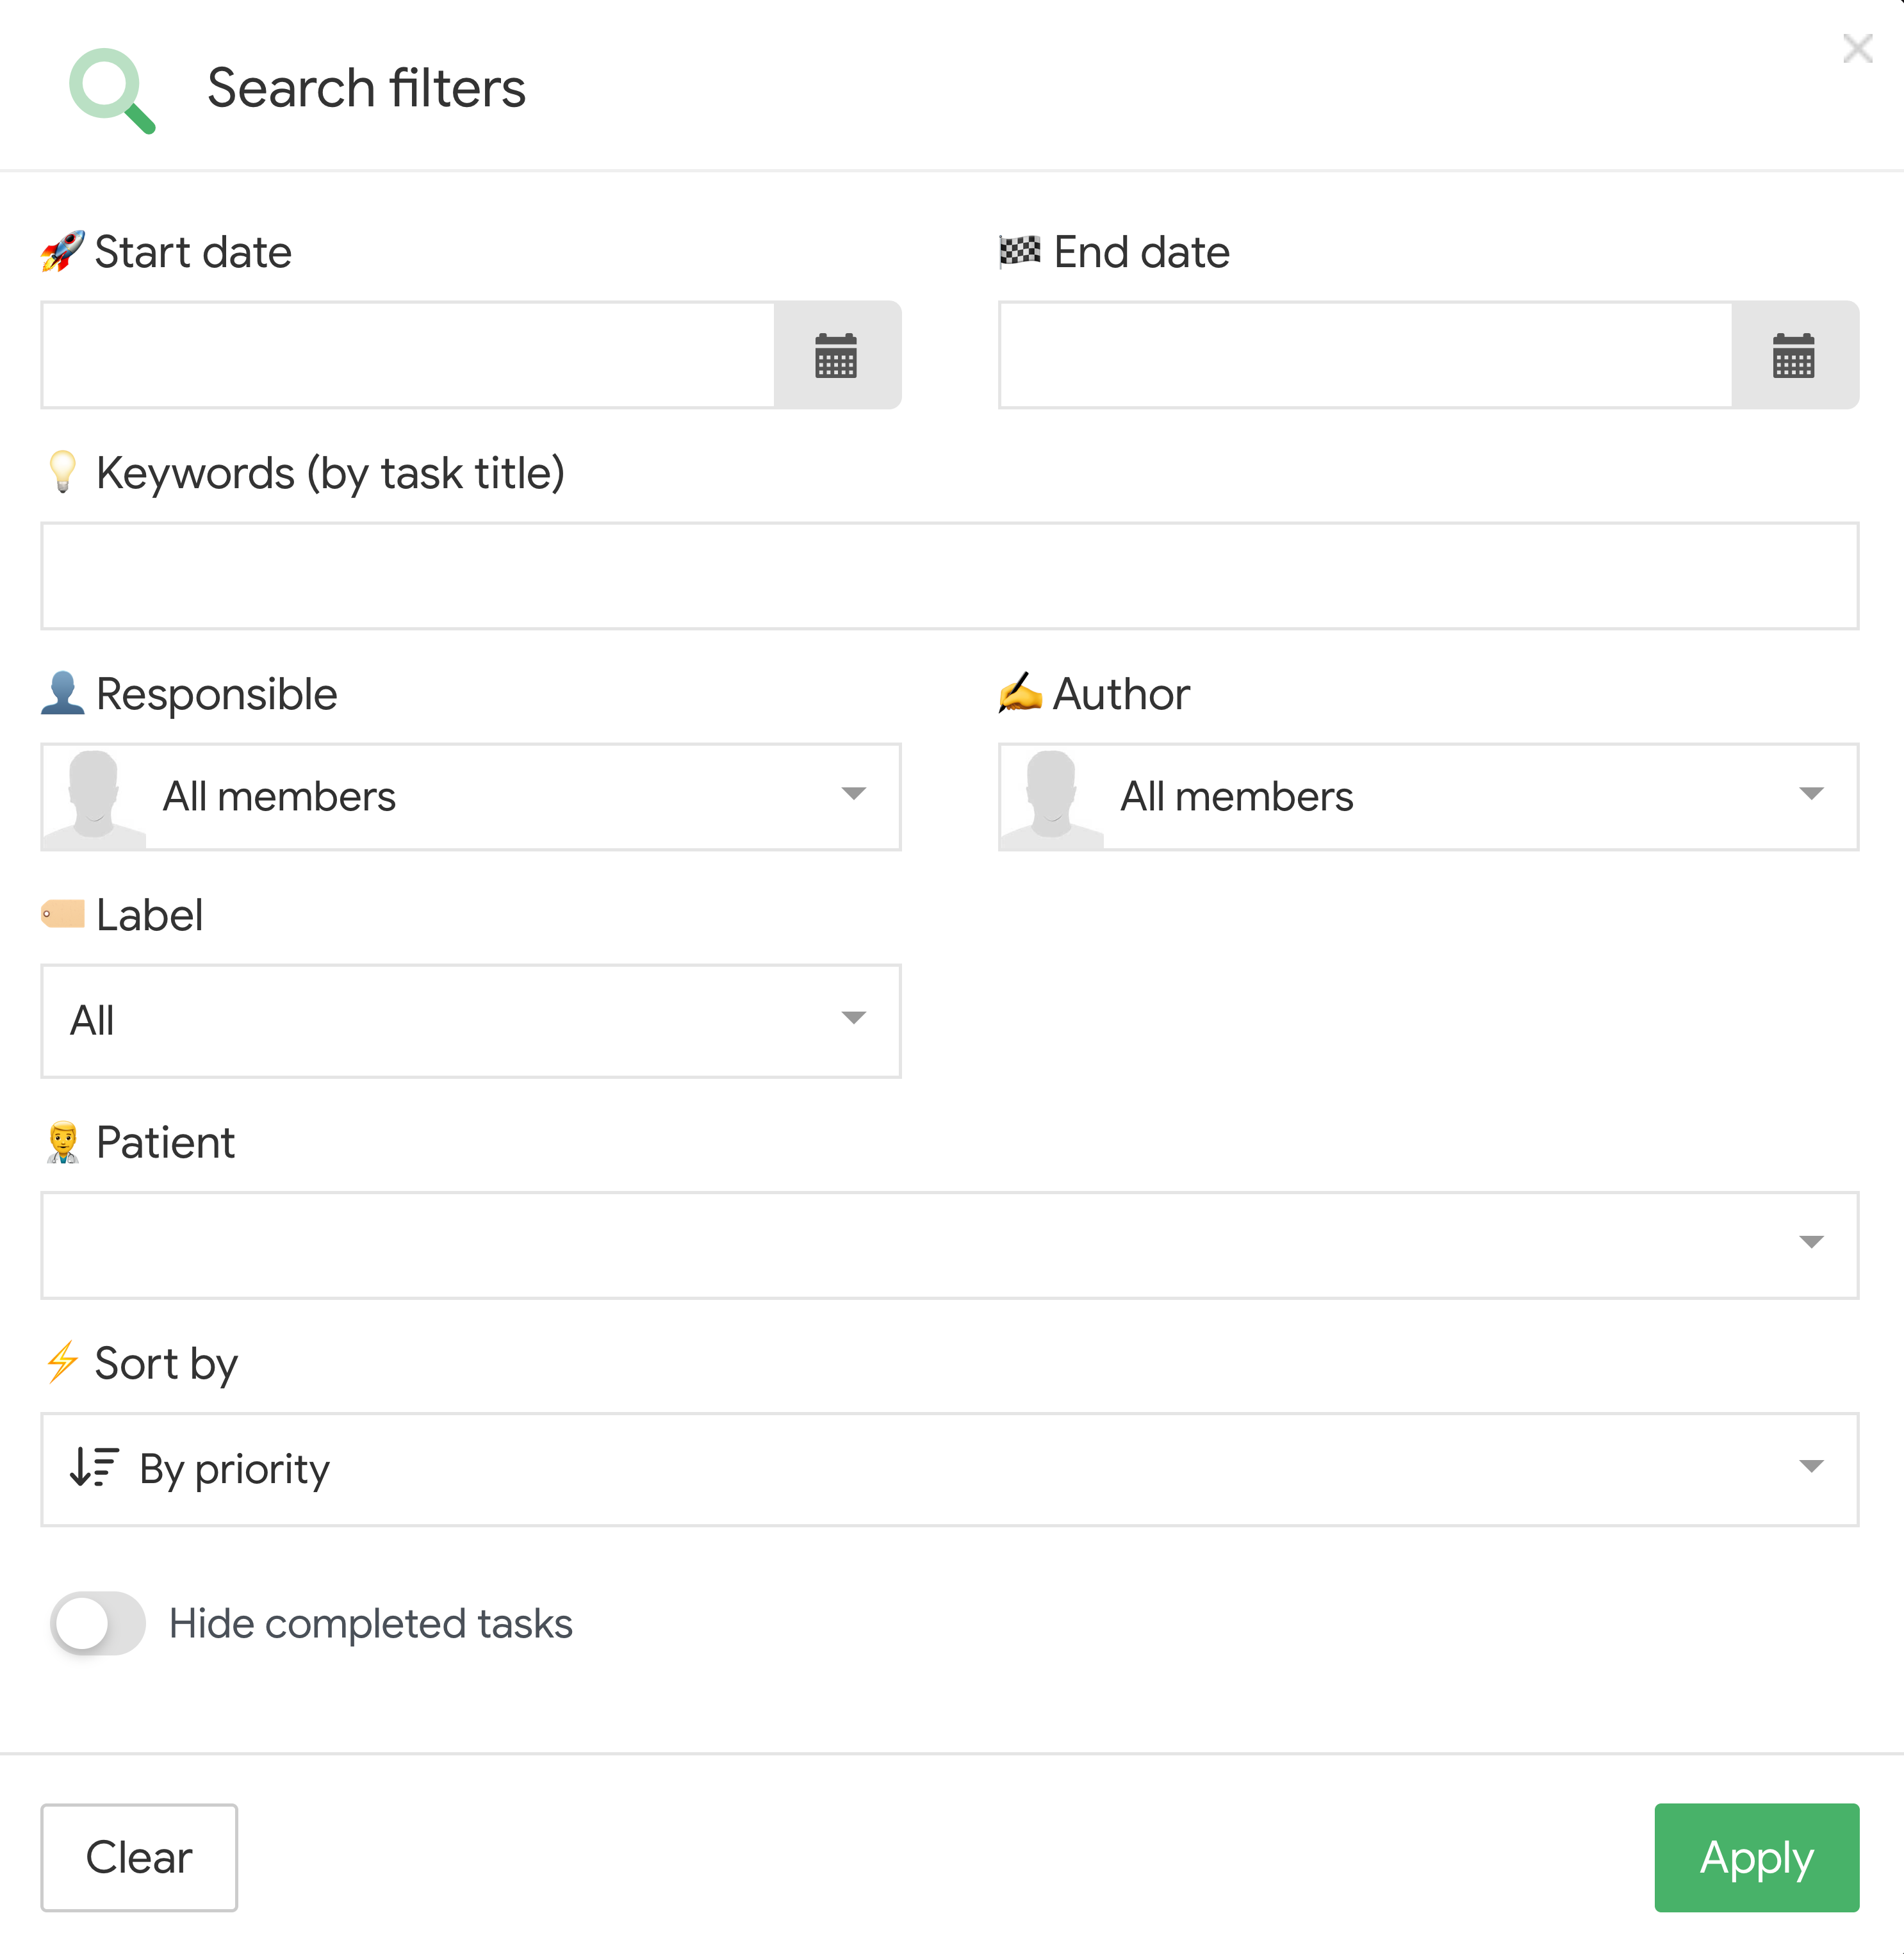
Filters and search
Filtering system
Find the tasks you need by various criteria:
By specialists – responsible (who performs the task) and author (who created the task);
By status – New, in progress, completed, etc. You can select several statuses at once;
By deadlines – start date, end date, overdue tasks;
By categories – tags, patient, priority;
Text search – by task name and by text in the description and comments.
Saving filters
Working with filters is organized as follows:
Configured filters are saved automatically
Quickly reset all filters with one click
Combine different types of filters
Results can be sorted by priority (high to low), creation date, and start/end date.
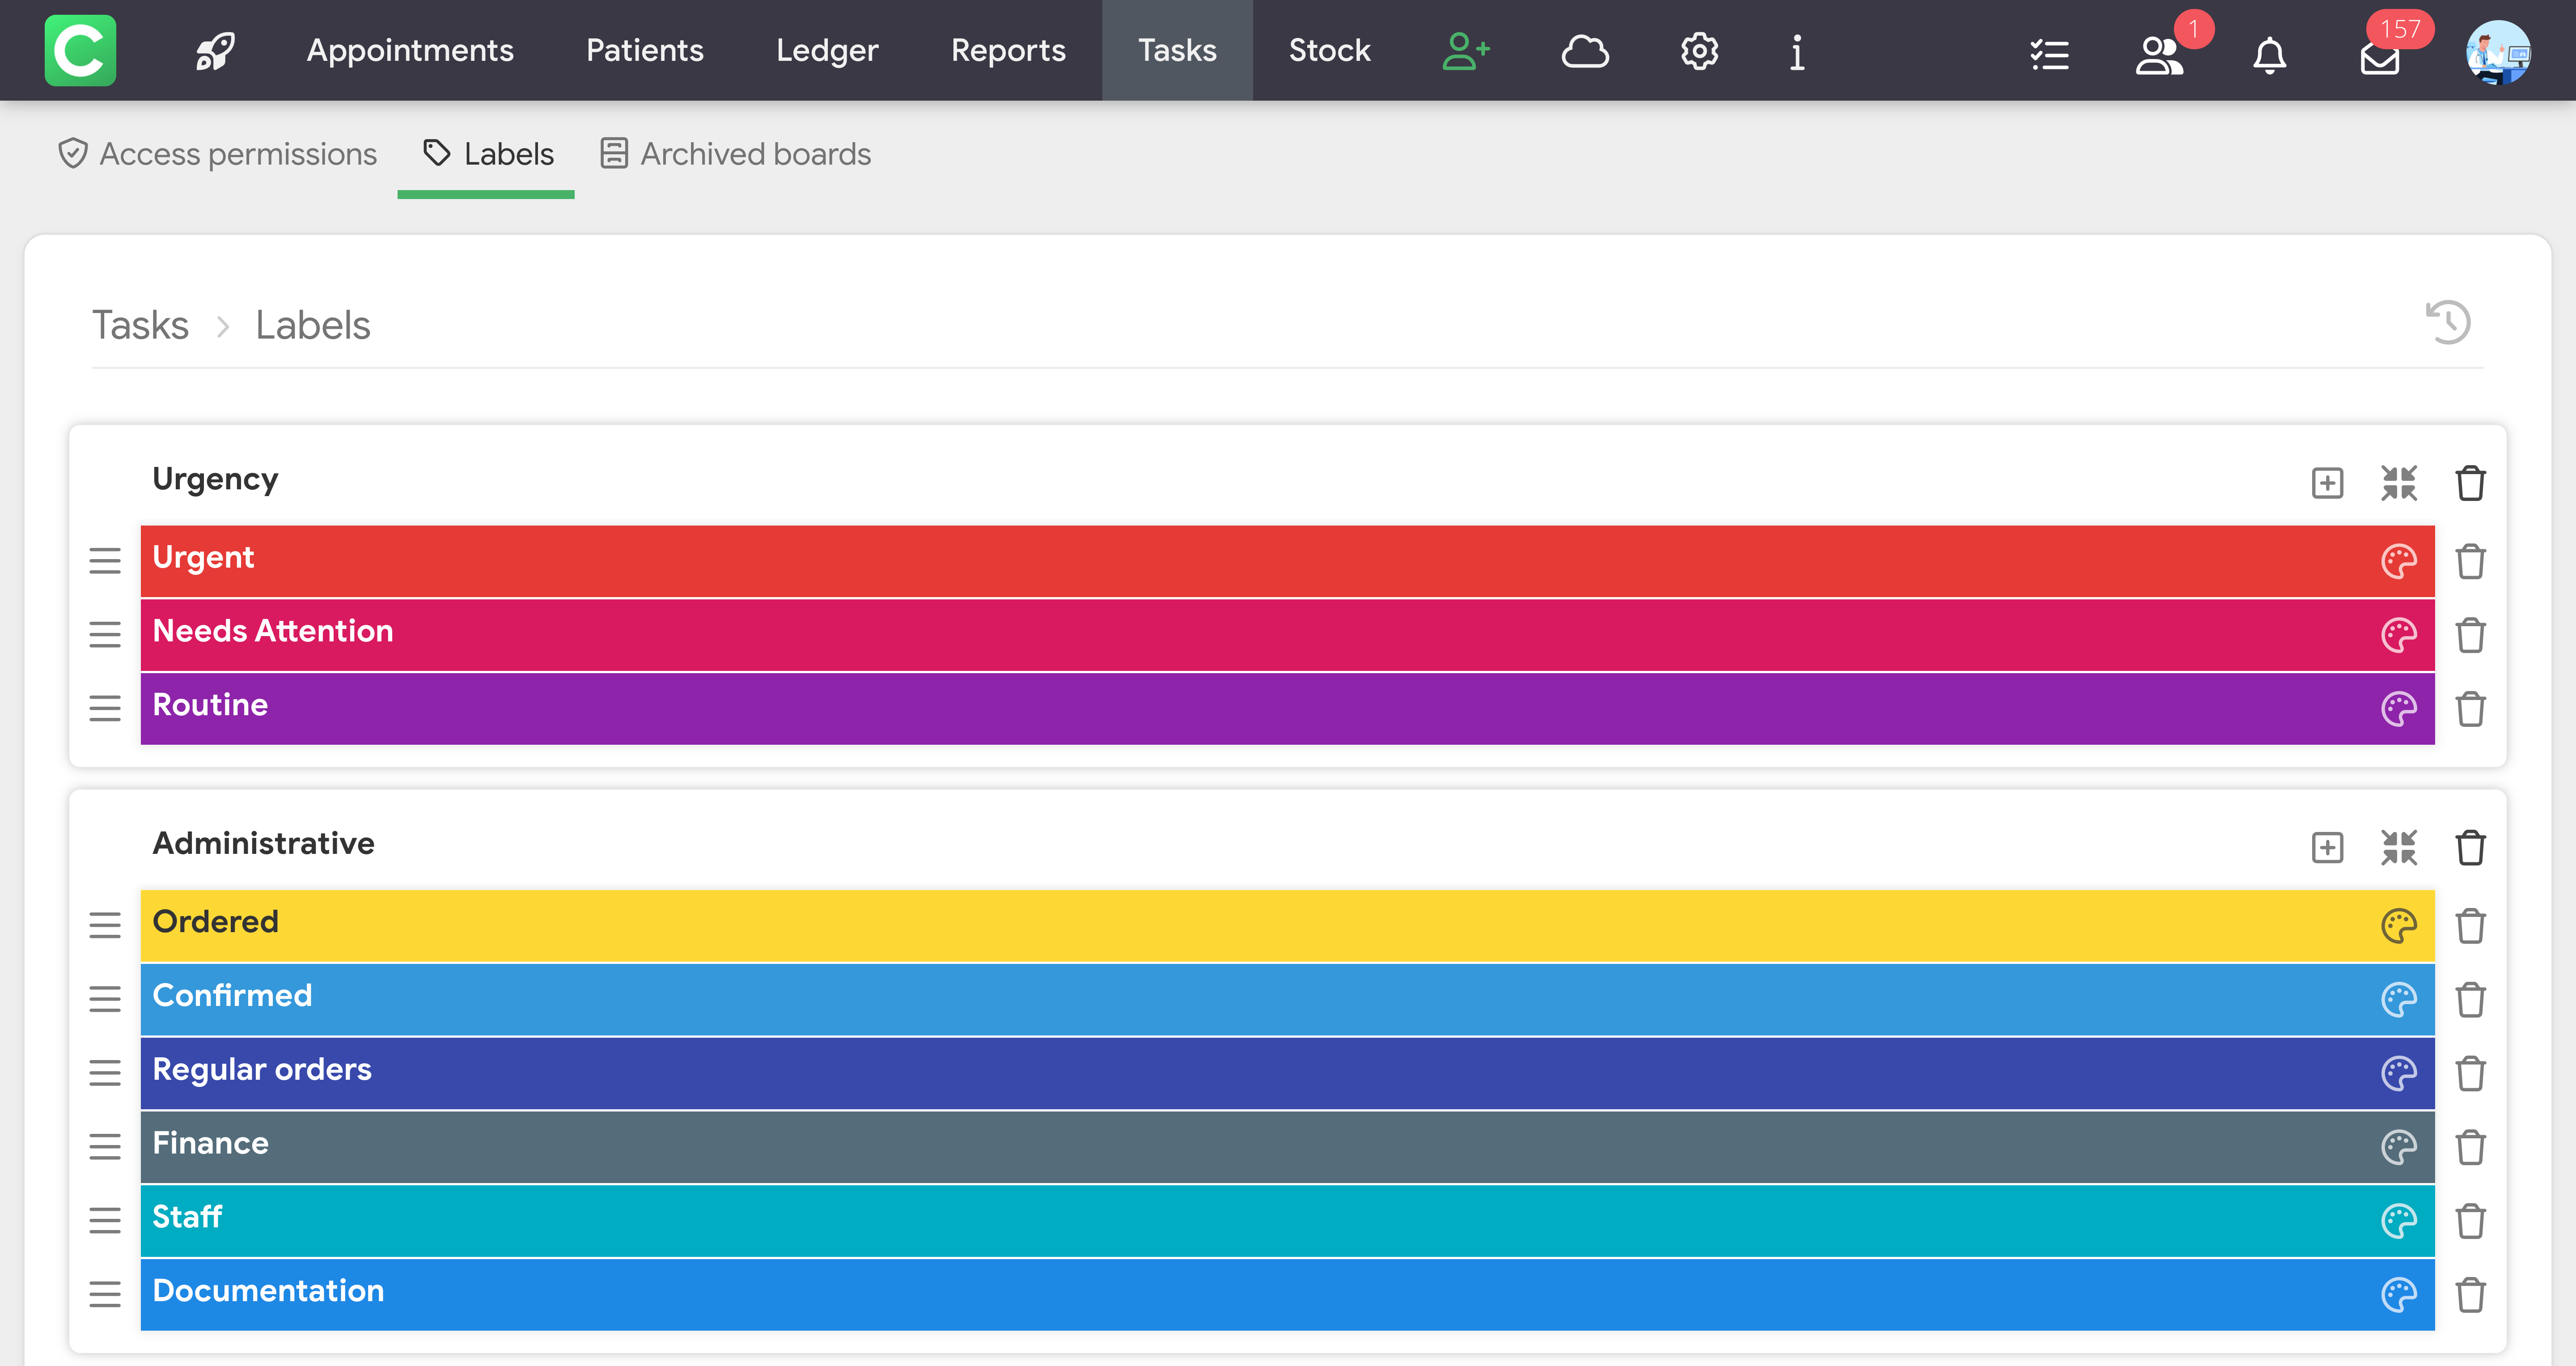
Labels and categorization
What are labels
Labels are categories for organizing tasks. They help you quickly find similar tasks and analyze work processes.
Setting up labels
To create tags for your clinic, follow these steps:
Go to General Task Settings
Select the Tags section
Create new tags with names
Assign colors for visual differentiation
Save your settings
Using labels
Labels allow you to organize your work effectively:
Assign multiple tags to a single task
Filter tasks by tags
Analyze workload by category
Create reports by work area
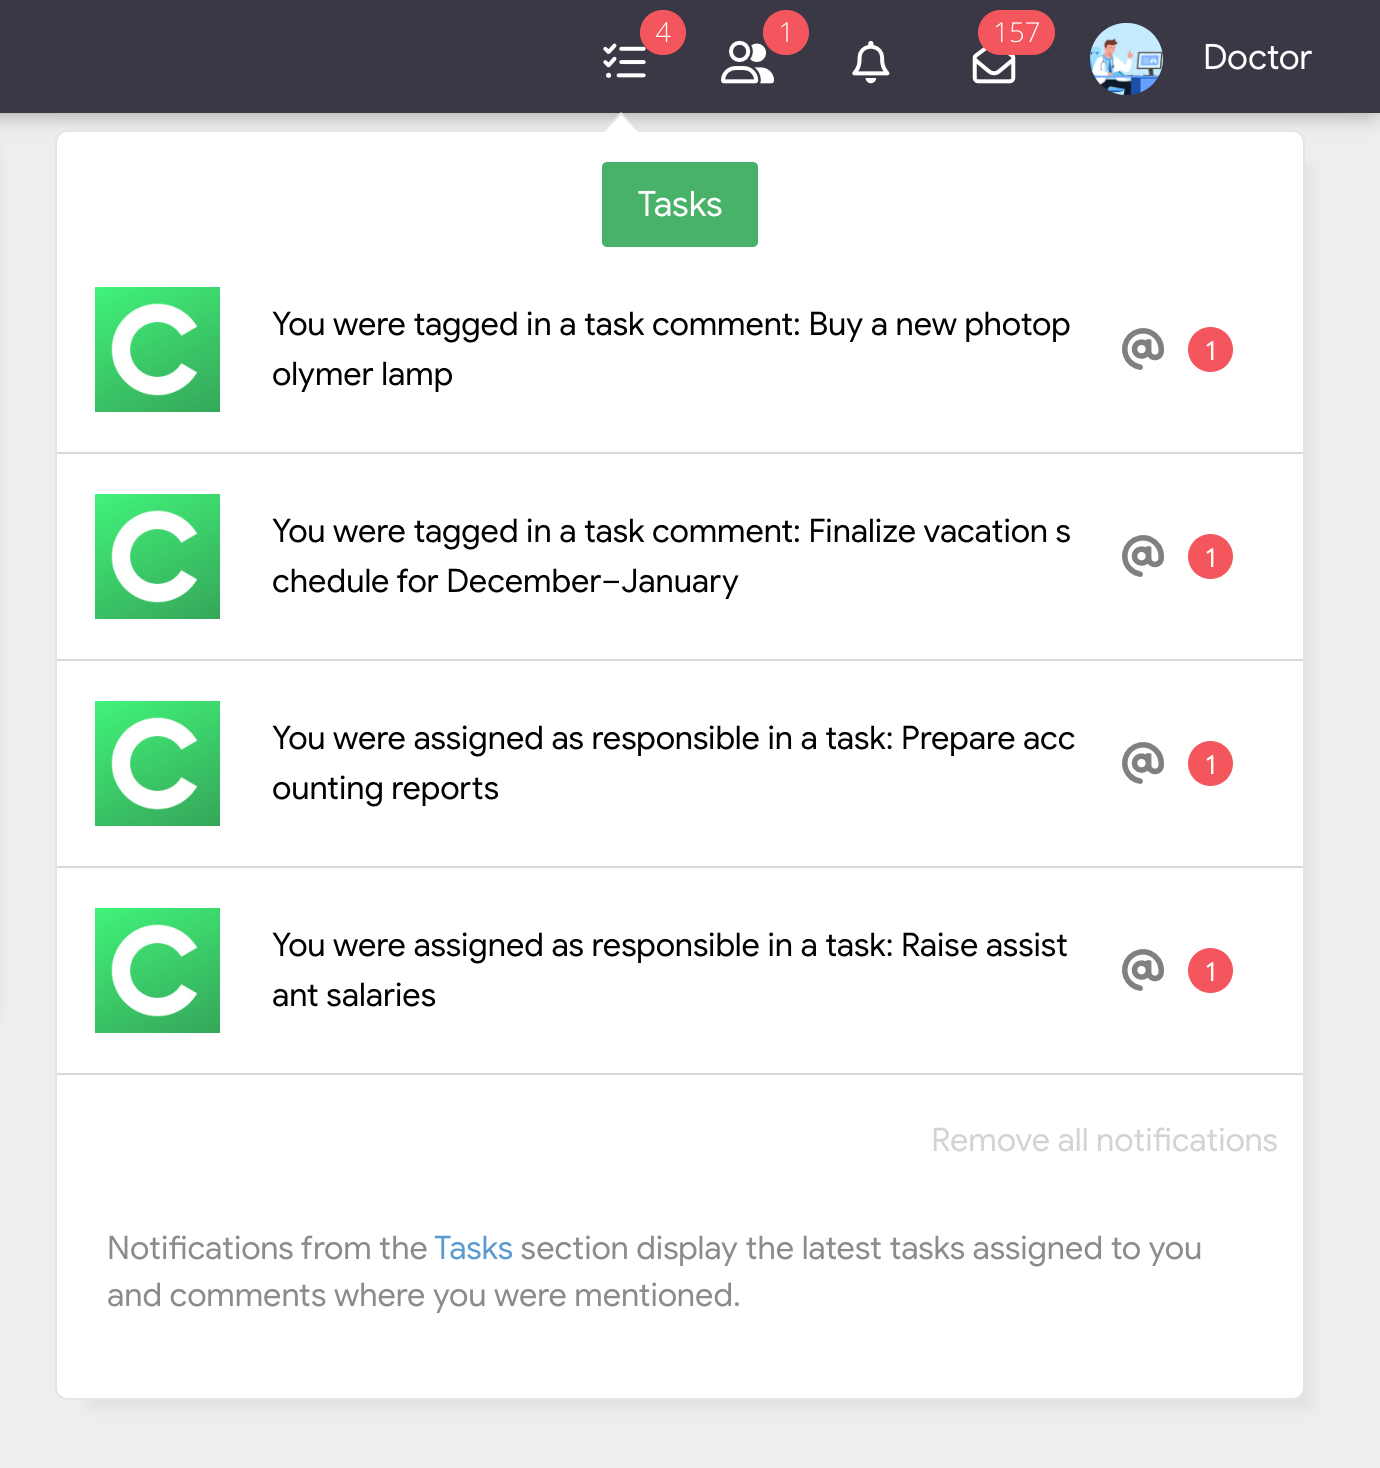
Task Notifications
In the upper panel of Cliniccards, at the top right, there is a Task notifications icon. It shows all notifications related to tasks: assignments to responsible persons, mentions in comments, new comments, and other actions in tasks.
Important: notifications from all clinics in which the user is a member and where the Tasks module is activated are displayed here. That is, if you work with several clinics, all notifications from their tasks are collected in one place.
When you click on a specific notification:
the system will open the corresponding task;
if the task belongs to another clinic, the user will be automatically switched to that clinic.
This allows you to not miss important actions in tasks and quickly switch between clinics without manual switching.
Frequently asked questions and solutions
Q: How many boards should I create? Start with 2-3 boards for the main areas of work. Add new ones as needed.
Q: How do I organize work between the clinic and the laboratory? Create separate boards for each department with their own statuses and processes.
Q: Can the author of a task be changed? No, the author remains unchanged. The person responsible can be changed at any time.
Q: What happens to overdue tasks? They are highlighted in the interface. The system does not block work, but shows the overdue status.
Q: Is the history of changes saved? Yes, all actions are logged in the Edit Log.
Tasks in Cliniccards are a powerful tool for organizing all work processes. Start with simple boards and gradually adapt the system to the needs of your clinic or laboratory. Regular use of the task manager will help you remember everything and keep all processes under control.